")
How you can add an admin user to the WordPress when you do not have access to WP-admin (using database MySQL)
If you’ve been locked out of your WordPress site, possibly due to hackers deleting your admin account, or in case you forgot your admin credentials, you can restore access by adding a new admin user directly to the database via MySQL.
Before making any edits to your MySQL database, always back it up to prevent data loss. Once you regain access to your website, you might need to follow our beginner’s guide to fixing a hacked WordPress site. Now, let’s learn how to add an admin user to the WordPress database via MySQL, but firstly how to get to the phpMyAdmin.
Specifically, you can add a new admin user through phpMyAdmin, a web-based tool for managing MySQL databases, you can regain control – phpMyAdmin provides a user-friendly interface that allows you to perform various database operations such as running SQL queries, managing users, and importing/exporting data, all through your web browser. Most top WordPress hosting companies include phpMyAdmin, which you can find in the Databases section of your hosting account’s cPanel dashboard.
Where to find URL to phpMyAdmin
If you don’t know the URL to access phpMyAdmin, here are a few steps you can follow:
- Check your hosting provider – most hosting providers include phpMyAdmin in their control panel. Look for options like “Database Management” or “MySQL Databases” in your hosting control panel (e.g., cPanel, Plesk).
- Common URLs – sometimes, phpMyAdmin can be accessed via common URLs like:
http://yourdomain.com/phpmyadminhttp://yourdomain.com:2082/phpmyadminhttp://yourdomain.com:2083/phpmyadmin
- Ask your hosting provider – if nothing above works and you still can’t find the URL, contact your hosting provider’s support for assistance. They can provide you with the exact URL and login credentials if needed.
- Local Installation – if you’re running a local server (e.g., XAMPP, WAMP), phpMyAdmin is usually included. You can access it via
http://localhost/phpmyadmin.
Down you can see how can look like admin of our hosting provider (Cesky-hosting.cz), where you have mentioned phpMyAdmin URL:

Web based phpMyAdmin example in current hosting provider interface
When you in our case open the URL click https://mysql.spolehlive-servery.cz/ you will see phpMyAdmin interface. You also need to know your WordPress database credentials (database name, user name and password) – you should also see that or find that in your hosting provider interface or you should be able to create/change them here.
Once you login in phpMyAdmin you will see displayed all the tables in your WordPress database.
You will need to make changes to the wp_users and wp_usermeta tables.
We will start by adding new users to the wp_users rows/records.
How to add a new user to the wp_users table in MySQL database via phpMyAdmin
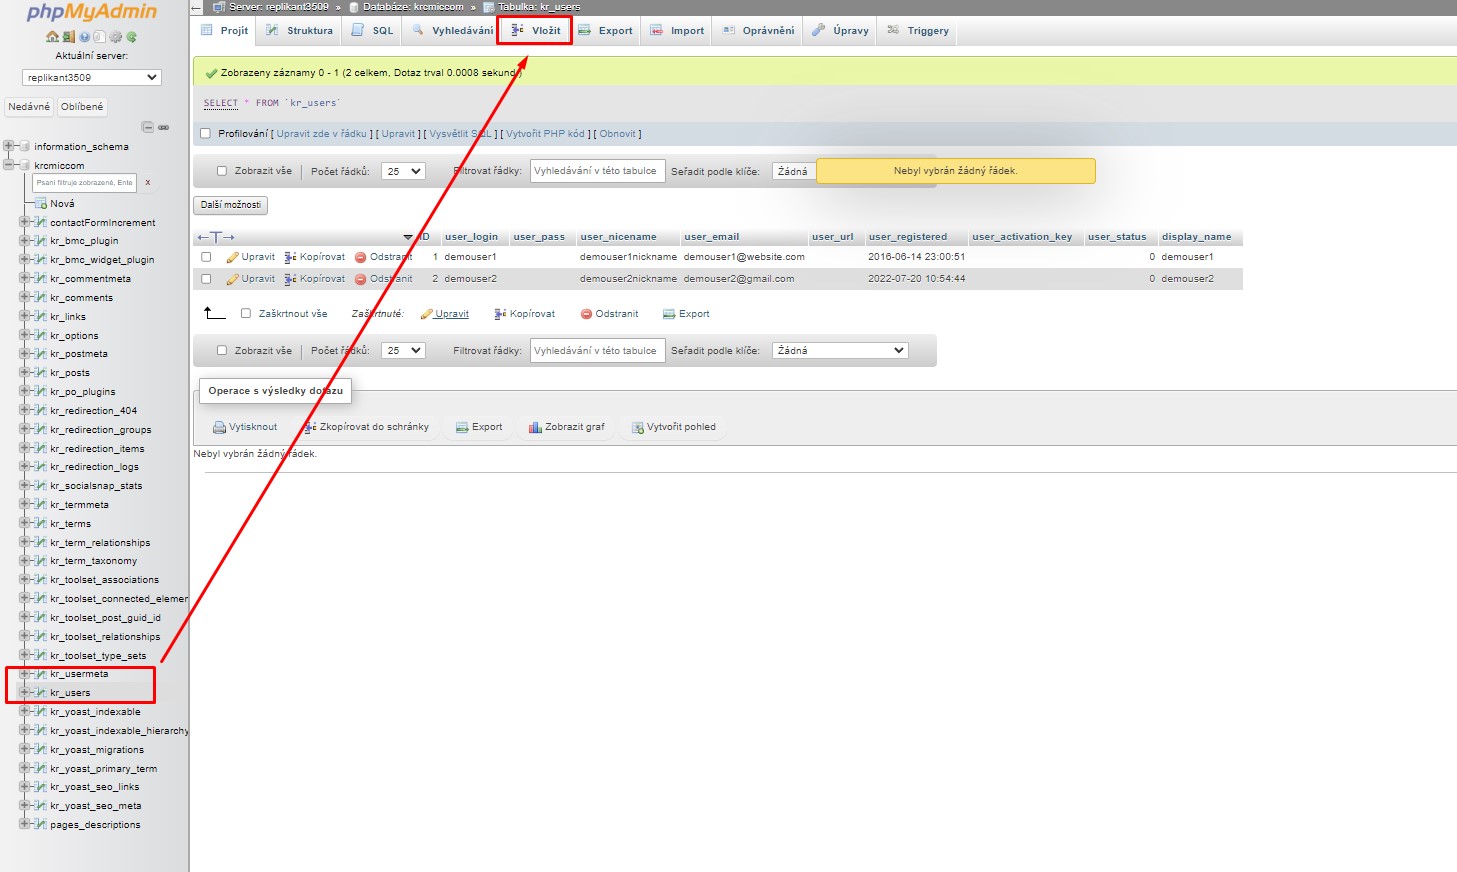
First, locate and click on the wp_users = open the wp_users table (in some WordPress databases it can have different naming, so it can be named not just as wp_users but as some_different_prexif_users.
You have to check in database if you find similar record with similar name, or name which could be connected with users or record which will have same fields as in the screen below – means ID, user_login, user_pass, user_nicename, user_email etc.
This will display the current users listed in the table.
In the screenshot below, our demo website’s table has user IDs 1 and 2.

phpMyAdmin – user interface – wp_users with current MySQL records
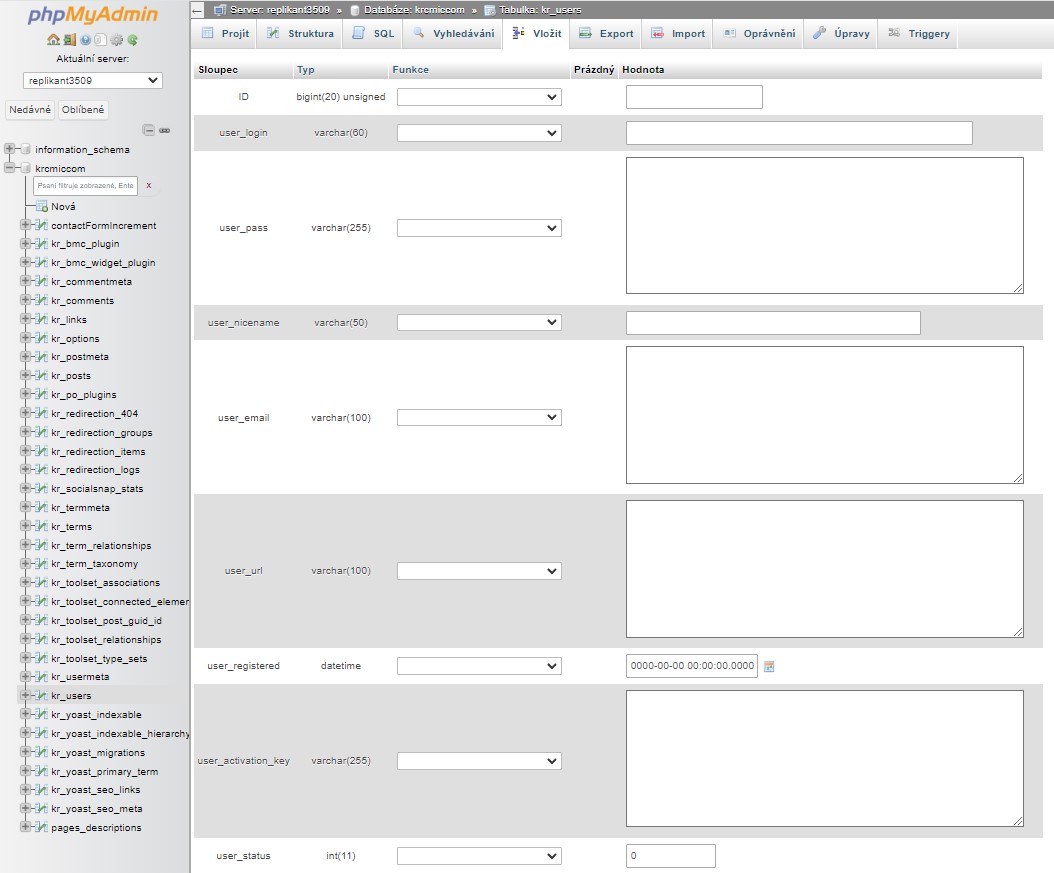
When we create a new user for our demo site, this ID needs to be unique, so we’ll type the number 3.
Click the ‘Insert’ tab at the top of the screen to input the information for the new admin user.
Example how to insert new records in MySQL via phpMyAdmin
You will see now screen below – where you need to fill:
ID: pick a unique number (in our example, we’ll use 3)user_login: the username that will be used when logging inuser_pass: add a password, and make sure to select MD5 in the function menu (see the next screenshot below)user_nicename: the user’s full name or nicknameuser_email: the user’s email address – this email address is used also for new password change (here will be sent notification if you select that option during the new password creation process or here you will receive also email notifications for forgot/lost passwords as a normal user)user_url: your website addressuser_registered: select the date and time the user was registered using the calendaruser_activation_key: leave blank – this field is used to store a unique activation key for user accounts. It is often used during account registration or password reset processes. By setting this field to an empty string'', you are indicating that there is no activation key currently associated with this user. What does it influence?- Account activation – the user can log in without needing to activate their account via an email link.
- Password resets – if the user needs to reset their password, a new activation key will be generated and stored here temporarily.
user_status: set this to 0display_name: the user’s full name or display name
Once you have finished, make sure you click on the “Go” button to store the new user (you will find the save button in the down right corner – if the language settings is different you will see there different text instead of “Go”).
In phpMyAdmin, the language used for the interface is determined by the lang parameter in the configuration file or can be set manually by the user through the interface. When you access phpMyAdmin, it usually auto-detects the browser’s language settings and defaults to that language if it’s supported. Alternatively, users can manually change the language by selecting their preferred option from a drop-down menu in the phpMyAdmin interface, typically found in the top navigation bar. The available languages are based on the translations included in the phpMyAdmin installation.
This process will just create a new user, but we will also have to give him correct privileges/access rights. This is done via wp_usermeta tables.
How to insert a new records in MySQL in phpMyAdmin – new user
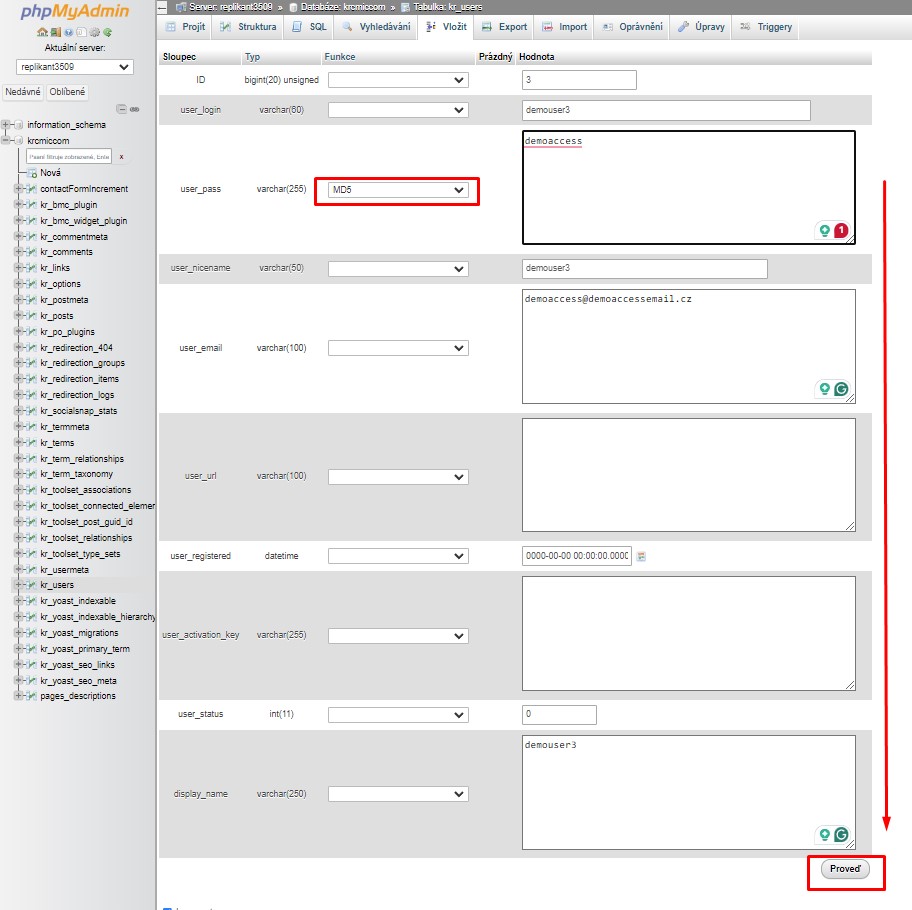
How to insert a new record in MySQL in phpMyAdmin – new user and MD5 encryption – once you have finished, make sure you click on the ‘Go’ button to store the new user.
Why to use MD5 for the new user login password?
MD5, which stands for Message-Digest Algorithm 5, is a widely used cryptographic hash function that produces a 128-bit hash value. In MySQL via phpMyAdmin, it is often used to hash passwords. This means converting a plain text password into a fixed-size string of characters, which appears random. The primary purpose of using MD5 for passwords is to store them securely in the database, as the original password cannot be easily retrieved from the hash. However, it’s important to note that MD5 is no longer considered secure against modern threats, and stronger algorithms like SHA-256 or bcrypt are recommended for password hashing.
How to add privileges/access rights to a new user to the wp_usermeta table in MySQL via phpMyAdmin?
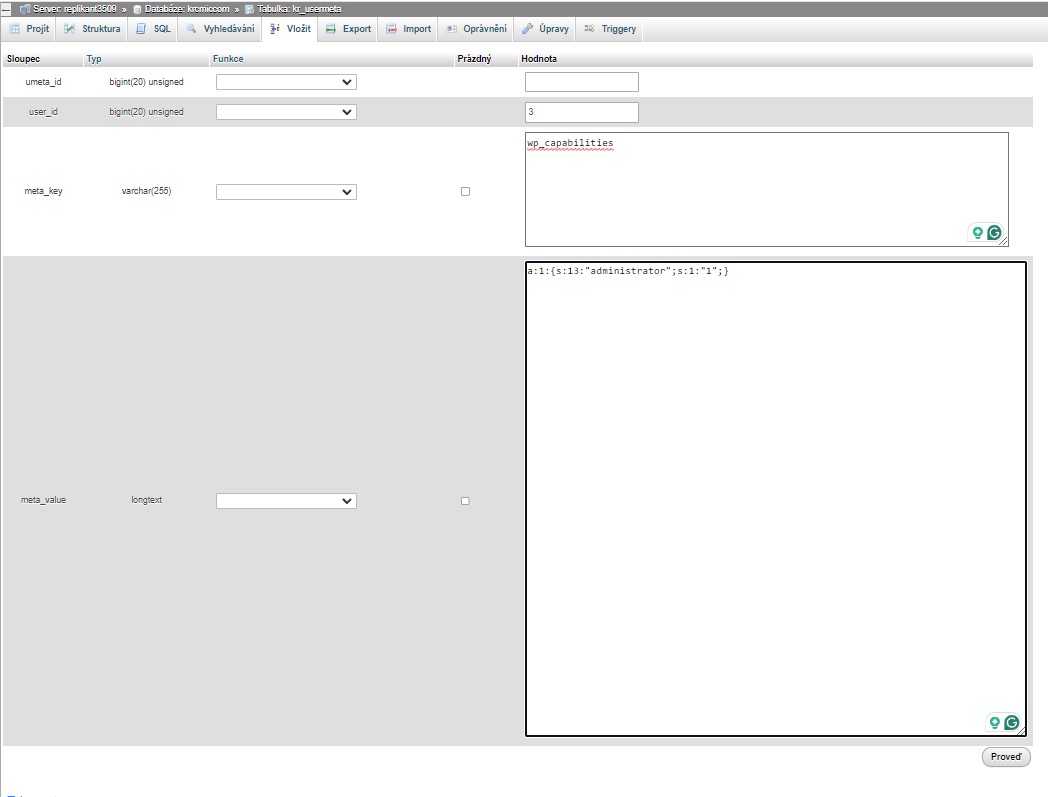
How to add privileges/access rights to a new user to the wp_usermeta – 1st part
To proceed, locate and select the wp_usermeta table. Click on the ‘Insert’ tab similar to the previous step. Fill in the Insert form with the following details:
- unmeta_id: Leave this field blank (it will be auto-generated).
- user_id: Enter the user ID you used in the previous steps when adding the new user to the
wp_userstable (in our case will be ID number 3). - meta_key: Enter
wp_capabilities. - meta_value: Input
a:1:{s:13:"administrator";s:1:"1";}.
This process assigns the necessary user meta information to create an administrator account.
Insert in MySQL in phpMyAdmin – new user rights in wp_usermeta
Here is a brief explanation, of what did you actually do:
unmeta_id – this is a unique identifier for each entry in the wp_usermeta table. You don’t need to enter anything here because MySQL will automatically create a unique number for it.
user_id: This is the ID of the user you created in the wp_users table. It links the user’s meta information to the specific user account. Make sure to use the same ID you used when creating the new user.
meta_key: wp_capabilities – this key tells WordPress what the user can do. It defines the user’s role and their capabilities.
meta_value: The meta_value of a:1:{s:13:"administrator";s:1:"1";} in the wp_usermeta table is a special code that WordPress uses to define user roles. Here’s a simple breakdown:
a:1: This means there’s one item in the list.{s:13:"administrator";s:1:"1";}: This is the item in the list.s:13:"administrator": This part means the word “administrator” is the role.s:1:"1": This part means the role is active.
So, this code tells WordPress that the user is an administrator.
If you want to create a new user with an editor or other role in the database – the easiest way is to create an admin account first and then create new editors in admin directly.
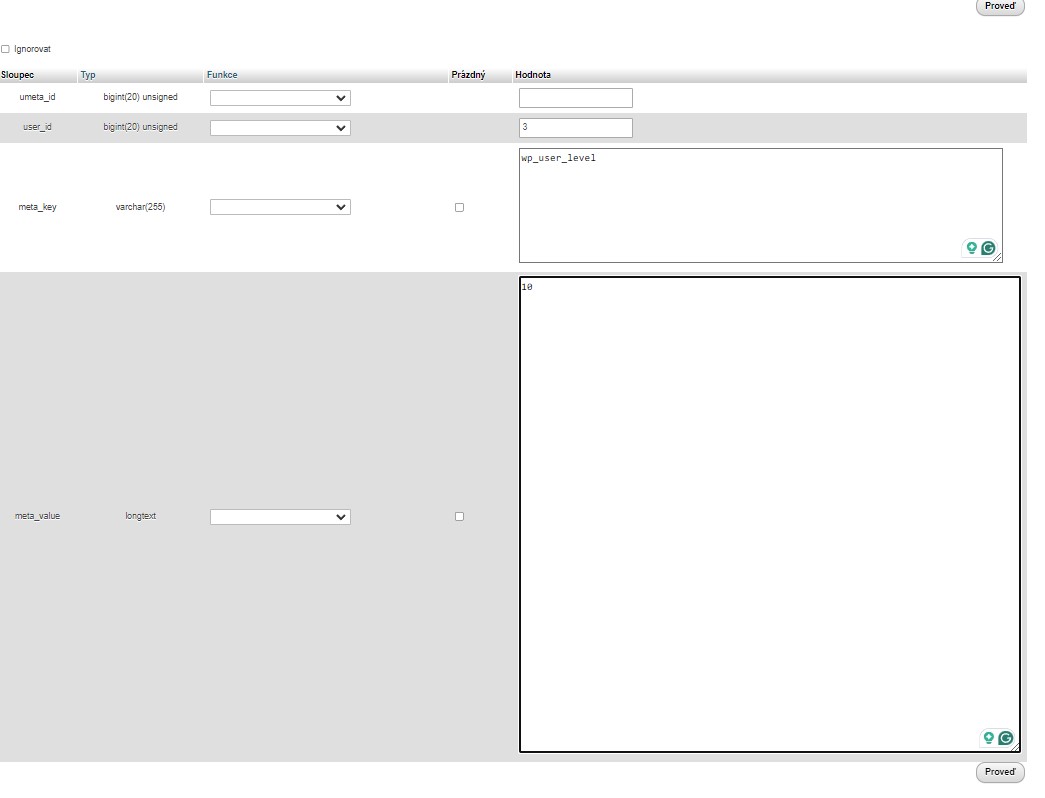
How to add privileges/access rights to a new user to the wp_usermeta – 2nd part
After that, when you scroll down, you should find the same field names for a second row. You need to add the following information:
unmeta_id: leave this blank (it will be auto-generated)user_id: the user ID you used in the previous stepsmeta_key: you need to enterwp_user_level= it actually tells WordPress about the user’s access level.meta_value: 10 = gives the user full admin rights
When you have finished entering the information into the fields, you need to click the ‘Go’ button. Congratulations, you have created a new admin username!
Insert in MySQL in phpMyAdmin – new user rights in wp_usermeta – second part of the table
Now, you should be able to log in to your WordPress admin area using the username and password you specified for this user.
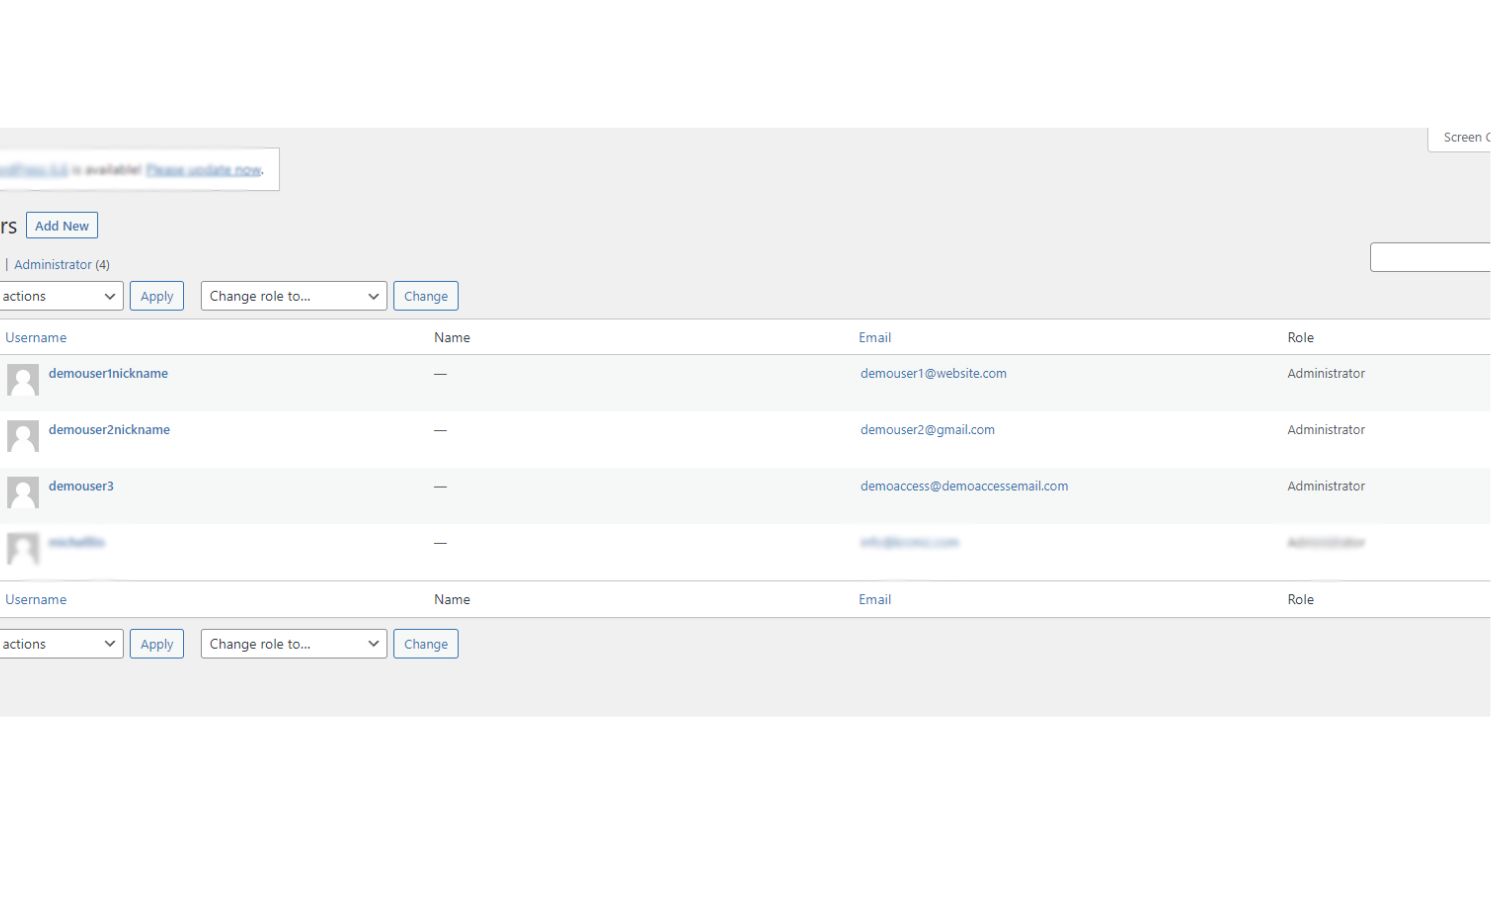
After logging in, navigate to Users » All Users and click on the username you just created.
Without changing anything, scroll to the bottom of the page and click the ‘Save’ button.
This will allow WordPress to clean up the user you just created and add some extra information that is needed. When WordPress “cleans up” the new user you created, it means that the system is adding necessary background information to ensure the new admin user functions correctly. This includes linking the user to various settings, roles, and permissions that are essential for the user to have the appropriate access levels and capabilities within the WordPress admin area. This process ensures the new admin user can perform all tasks expected of an administrator, such as managing posts, plugins, themes, and other users, without running into issues.
Edit users/their user roles/admins in WordPress
This action allows WordPress to finalize the user creation and add any necessary additional information for the new user.
You can also use the similar process for edits of current records of users (for example you can change them their username, which is not normally allowed via WordPress admin interface – just go to wp_users and open any of the records in here).
WARNING! If your WordPress database has a custom table prefix rather than wp_ you’ll need to use that for the capabilities and user_level entries or you’ll get issues trying to access the dashboard (in our example in some screens you can see instead of wp_users value kr_users, same for wp_usermeta => you can see in our example kr_usermeta etc.). For example, if your database table prefix is wp_abcdef_ then you would use wp_abcdef_capabilities and wp_abcdef_user_level in the appropriate fields when inserting the wp_usermeta table record.
Also, it is easy to get confused in phpMyAdmin and new users often forget to press the Go button – so always click on Go button again when adding a record to be sure.
How to add new admin user to the WordPress database using a SQL query
If you are a developer, then you can speed up the process using code. It is actually just another version of doing the same thing a little faster (you do not need in our case understand MySQL
Simply drop this SQL query into your database:
INSERT INTO `databasename`.`wp_users` (`ID`, `user_login`, `user_pass`, `user_nicename`, `user_email`, `user_url`, `user_registered`, `user_activation_key`, `user_status`, `display_name`) VALUES ('3', 'demo', MD5('demo'), 'YourNicemame', 'demouser@demouseremail.com', 'http://www.krcmic.com/', '2024-06-01 00:00:00', '', '0', 'YourName');
INSERT INTO `databasename`.`wp_usermeta` (`umeta_id`, `user_id`, `meta_key`, `meta_value`) VALUES (NULL, '3', 'wp_capabilities', 'a:1:{s:13:"administrator";s:1:"1";}');
INSERT INTO `databasename`.`wp_usermeta` (`umeta_id`, `user_id`, `meta_key`, `meta_value`) VALUES (NULL, '3', 'wp_user_level', '10');Just ensure in this case that you replace `databasename` it with the actual name of your database. Same you have to do with wp_users and wp_meta in case the naming in your database is different (you use custom fields). Additionally, make sure to update the other values to the desired ones for the new user, as we described in the first method.
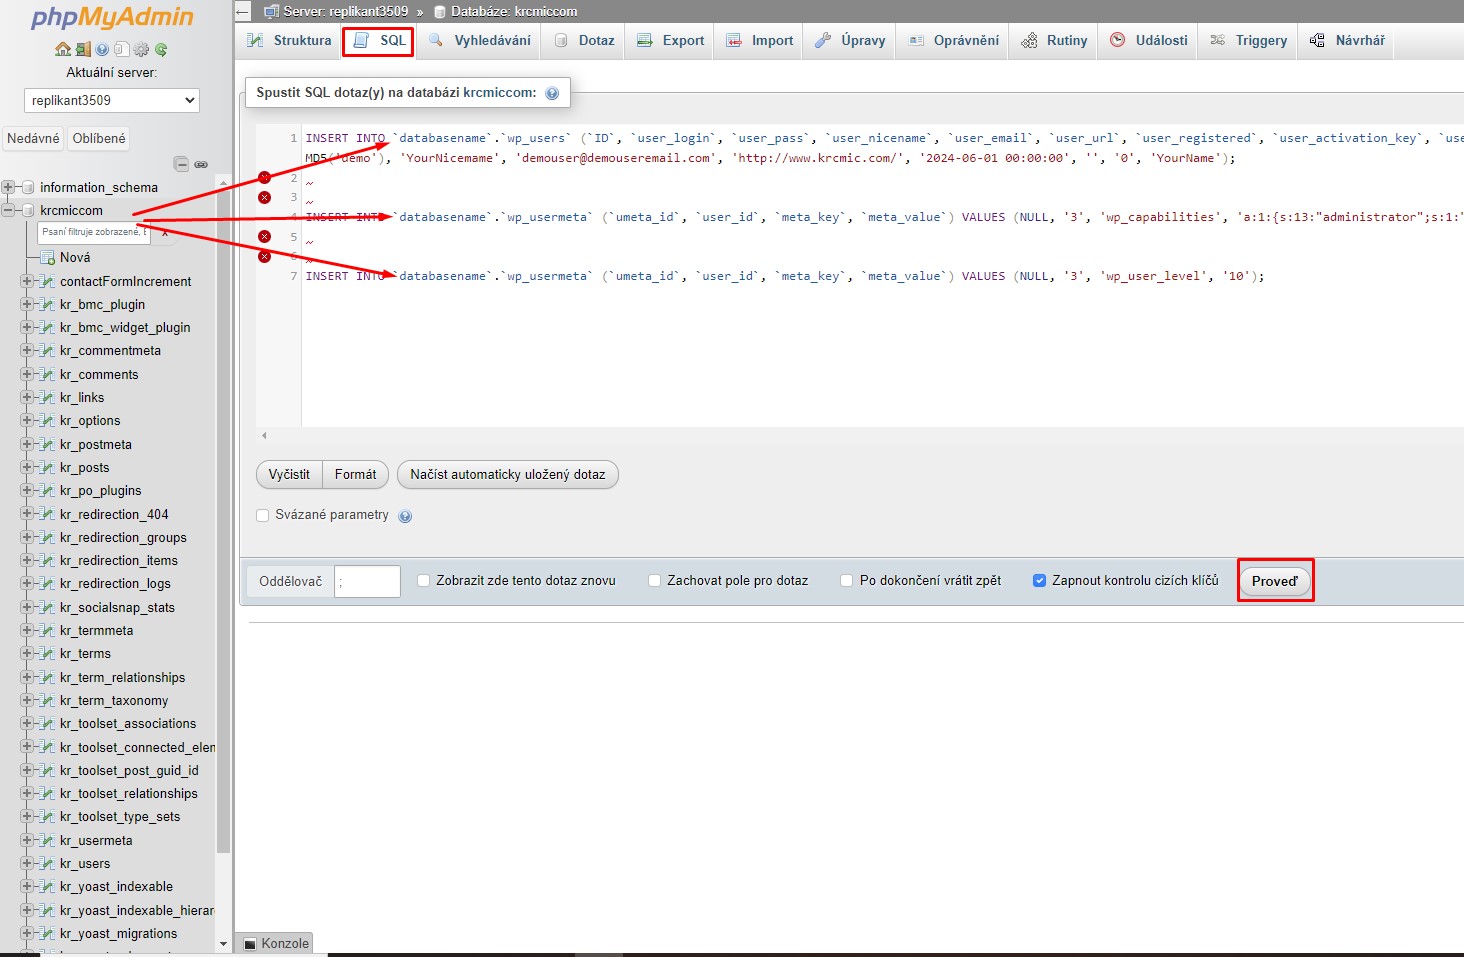
How to directly add a new admin user to MySQL database of your WordPress – you can click on SQL directly in the upper tab or click on your database name and then select SQL and paste the code above
How to directly add a new admin user to MySQL database of your WordPress – you need to change values (database name, or any other values, which has different names in your database specifically)
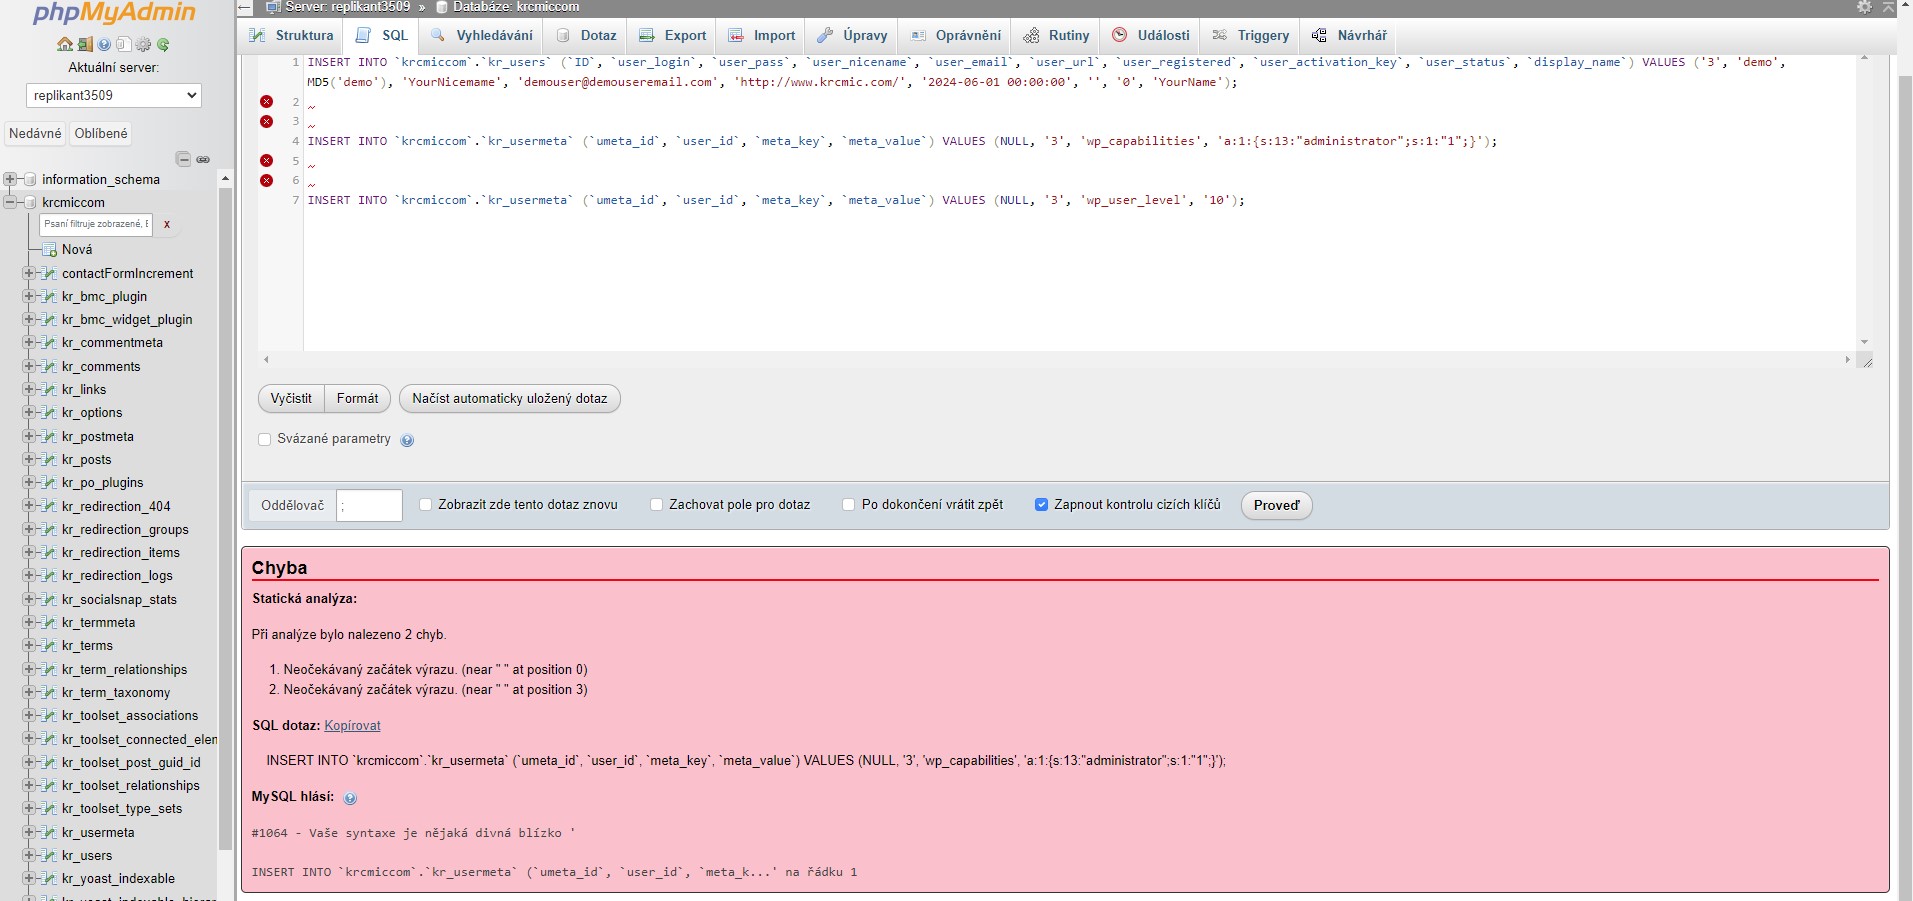
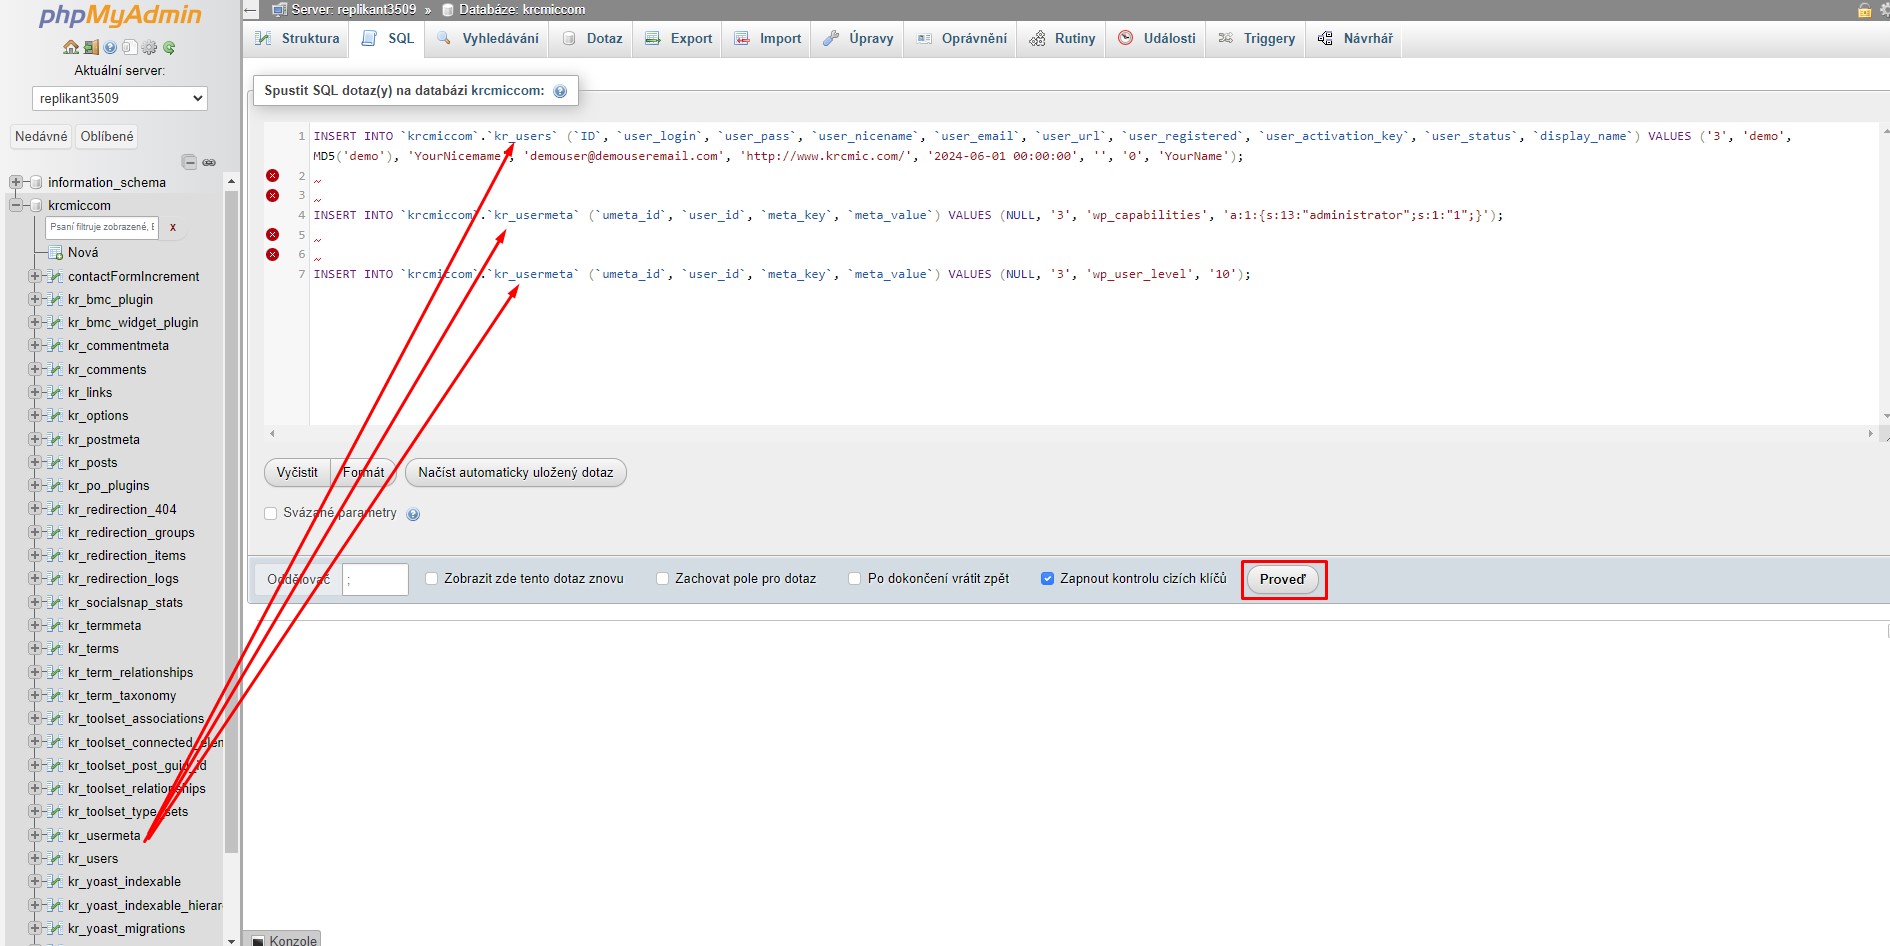
How to directly add a new admin user to MySQL database of your WordPress – even though it shows you some errors, you can check in wp_users (in our case kr_users) that a new user account was created
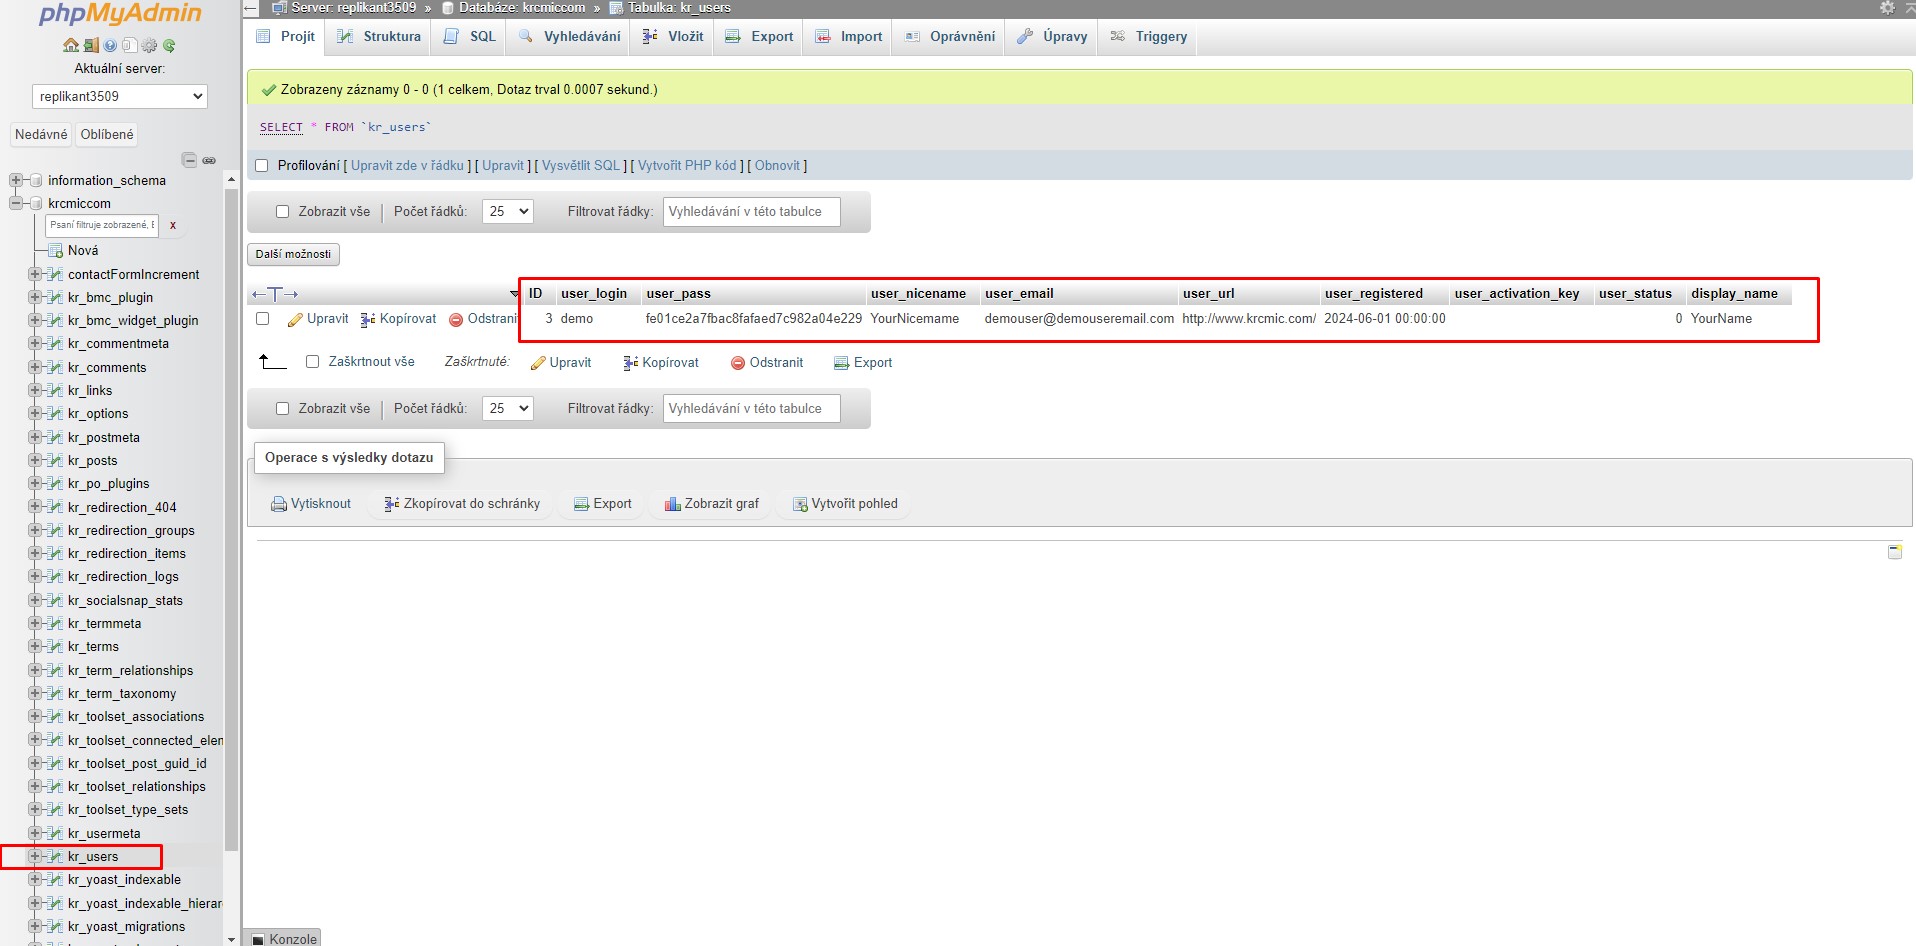
Here you can see it directly in wp_users (in our case in kr_users)
WARNING! If your WordPress database has a custom table prefix rather than wp_ you’ll need to use that for the capabilities and user_level entries or you’ll get issues trying to access the dashboard. For example, if your database table prefix is wp_abcdef_ then you would use wp_abcdef_capabilities and wp_abcdef_user_level in the appropriate fields when inserting the usermeta table record. Also, it is easy to get confused in phpMyAdmin, think you didn’t press the Go button, and click the Go button again when adding a record.
Also you can see the error in case you already have the same record ID in the table (in our case last ID was 3, so in case you already have user with that ID, you have select different number).
I marked in the code with blue color all possible values you could change in case you see an error.
How to add an admin user in WordPress Using FTP – very easy tutorial
In case none of these methods mentioned above worked for you, there is also another option for how you can add a new user to WordPress – you can upload him directly via FTP.
There are certain scenarios where adding a WordPress admin user via FTP can be crucial:
- Lost admin access – if you’ve forgotten your password, been locked out by a security plugin, or face issues with a plugin or theme preventing dashboard access, creating a new admin user through FTP can help you regain control.
- Corrupted WordPress – common WordPress errors might block access to the admin dashboard. Adding a new admin user via FTP can restore your access.
- Security issues – if your site gets hacked and admin access is compromised, creating a new admin user can help you regain control and secure your site.
- Migration problems – during site migration to a new server, if the admin user fails to work or needs resetting, adding a new admin user via FTP can resolve the issue quickly.
With these scenarios in mind, we will guide you through the step-by-step process of adding an admin user to your WordPress site using FTP.
Why use FTP over phpMyAdmin and MySQL database changes
Using FTP to add an admin user in WordPress can be advantageous over phpMyAdmin and direct MySQL database changes in certain situations:
- Accessibility – FTP can be accessed even when you cannot reach your WordPress admin area or phpMyAdmin interface due to server issues or lockouts.
- Simplicity – FTP requires fewer steps and less technical know-how compared to executing SQL commands in phpMyAdmin.
- Reliability – FTP allows you to upload files directly, bypassing potential database errors and ensuring changes are implemented immediately.
- Security – if your database is compromised, using FTP to create a new admin user can help secure your site without exposing sensitive database operations.
- Minimal dependency – using FTP can help recover from errors by allowing you to manually edit or replace corrupted files, ensuring that you have more control over the troubleshooting process.
- Less risk of data corruption – FTP operations are less prone to cause database corruption compared to direct database edits, especially in the hands of less experienced users. This method is particularly useful for those who are more comfortable with file transfers and wish to avoid the complexities of direct database manipulation.
- Error recovery – FTP does not depend on the availability of the database or web server, which can be advantageous during critical downtime or when other methods are inaccessible.
How to add a new admin user/new admin account in WordPress using FTP protocol
To start, you’ll need an FTP client. This software allows you to access your website files without logging into your WordPress dashboard. We’ll use FileZilla in this tutorial due to its ease of use.
First, connect to your website with the FTP client using your FTP access details, typically found in your hosting control panel.
For step-by-step guidance, refer to our guide on using FTP to upload files in WordPress.
Once connected, locate your current WordPress theme’s functions.php file. It is found in the following path:
/public_html/wp-content/themes/your-current-theme/
For example, if your site uses the default Twenty Twenty-Four theme, the path will be similar to this:
/wp-content/themes/twentytwentyfour/

WordPress function.php – you can add new user also through FTP by editing functions.php file
Once you have located the functions.php file, double-click to download it using FileZilla (the file will be downloaded somewhere in your local drive – usually in the Downloads folder in case you did not select a different folder).
Also do not forget to create one more backup file of functions.php in case you change some code incorrectly and you will not be able to revert back your changes (for the complete new clean WordPress installation using the default Twenty Twenty-Four theme – there is very little chance you will do something wrong, but in older templates, you can do more harm in case you for example deleted some brackets or any other important piece of code resulting in site error). Creating a backup of everything is always a great habit. You can download the file and rename it – for example to functions.php07072024 (to be sure you will not accidentally rewrite it again and when you move it to the live, after the download you can rename it back to just functions.php). This will help you to keep a great overview of what you downloaded/what kind of version of code from your day you have.
Next, find the downloaded file on your computer and open it with a plain text editor like Notepad.
Insert the following code snippet at the bottom of the file to create an admin user account:
function wpb_admin_account(){
$user = 'Username';
$pass = 'Password';
$email = 'email@krcmic.com';
if ( !username_exists( $user ) && !email_exists( $email ) ) {
$user_id = wp_create_user( $user, $pass, $email );
$user = new WP_User( $user_id );
$user->set_role( 'administrator' );
} }
add_action('init','wpb_admin_account');
Don’t forget to replace Username, Password, and email@krcmic.com with your specific values. You can use the same code snippet to create other user roles if needed.
In default WordPress clean installation, the $user->set_role() function can assign the following roles:
- Administrator = this user has full access to all admin features. Granting this kind of access privileges I already shared above.
- Editor = can publish and manage posts, including those of other users. Then you will use the value
'editor' - Author = can only publish and manage their own posts, value
'author'. - Contributor = can write and manage their own posts but cannot publish them, value
'contributor'. - Subscriber = can only manage their profile, value
'subscriber'.
So in case you want to add an editor, you will in the whole code above change the value to this: $user->set_role( 'editor' );
Next, simply save the file and return to your FTP client. Locate the file you just edited on the left side of the interface. Right-click on it, and select ‘Upload.’
A window will pop up indicating that the file already exists in your website files. Choose the ‘Overwrite’ option and click ‘OK.’
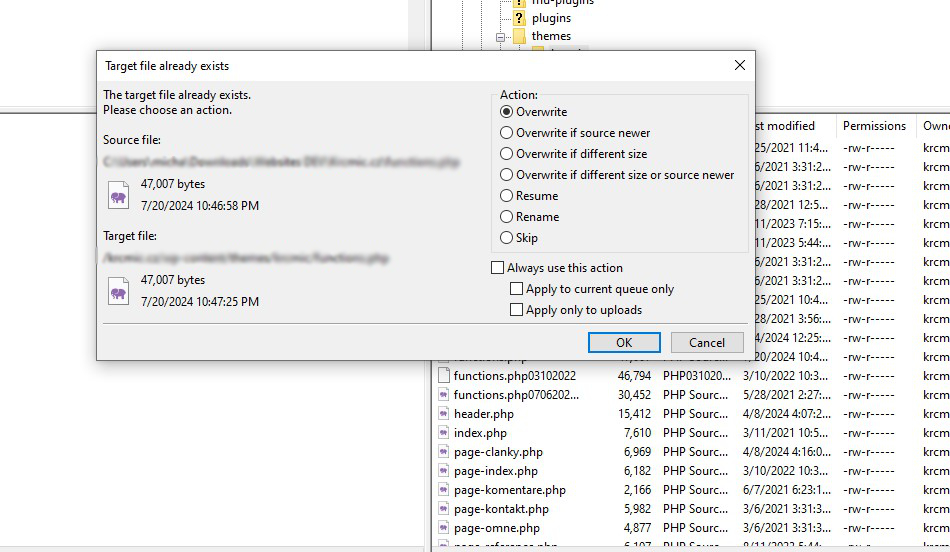
In your FTP client new window will pop up saying that the file already exists in your website files, click yes as we want to overwrite the file
Now, navigate to yourwebsitename.com/wp-admin in your browser, replacing yourwebsitename.com with your domain name.
If the code works, you can log in to the WordPress admin area with your new credentials.
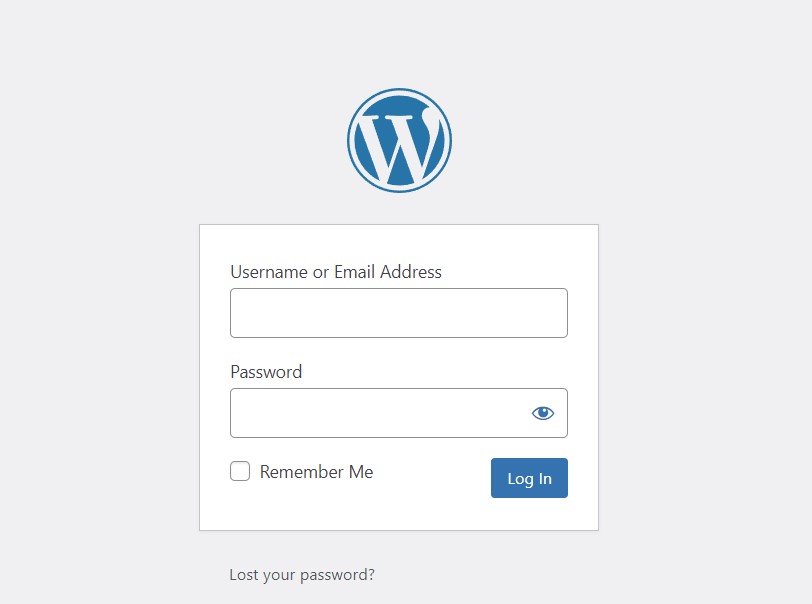
If the code works, you can log in to the WordPress admin area with your new credentials.
WARNING! Once logged in, return to your FTP client, open the functions.php file, and delete the added code to prevent it from executing again. Deleting the code won’t remove the user, but it ensures the script doesn’t run unintentionally or that any hacker will not use the same way to create another admin users also.
How to add a new admin user to WordPress with your web host’s file manager
If your FTP connection fails and you are still locked out of the WordPress admin, you can use your web host’s file manager to add an admin user. This method can be easier for beginners. Because usually hosting companies have their own cloud file manager and they look a bit less complicated than FTP managers, and also finding something like PSPad for free on a Mac is a long shot for complete beginners…
So how to start? How you can get to your hosting cloud file manager?
Firstly, you will just need to ask the hosting company about the URL/where in the hosting admin interface you find cloud file manager. Each hosting has it differently.
You will actually same folders as in FTP client.
When you log in to the cloud file manager, the rest of the process is actually the same.
You will need to get login credentials – so you need to create them or ask your hosting provider to let you know what values you should paste in. You will usually need to know the server, port, username, and password which are actually the same values you will use also when using classic local FTP managers like Filezilla or Total Commander etc.
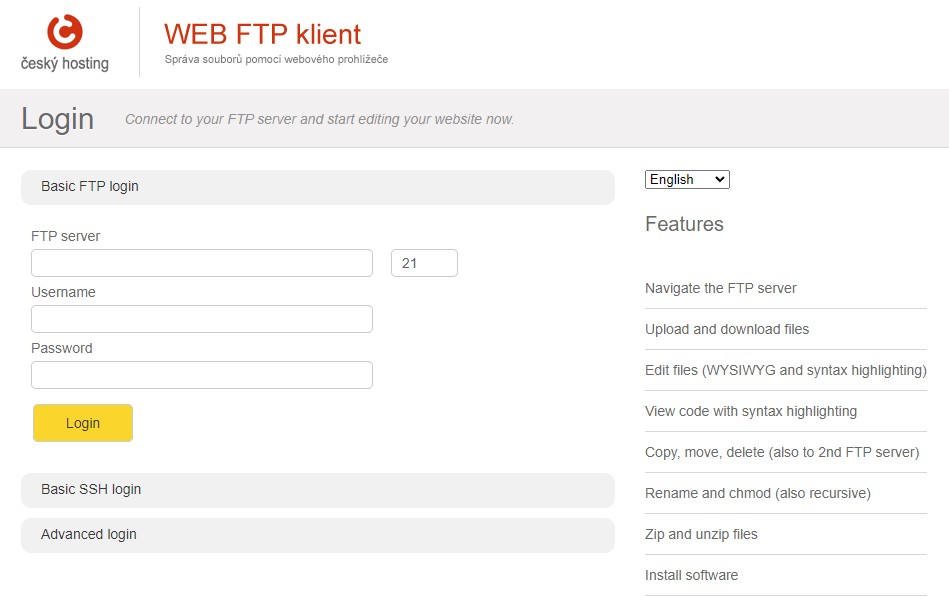
This is how can look like the login page for web FTP client
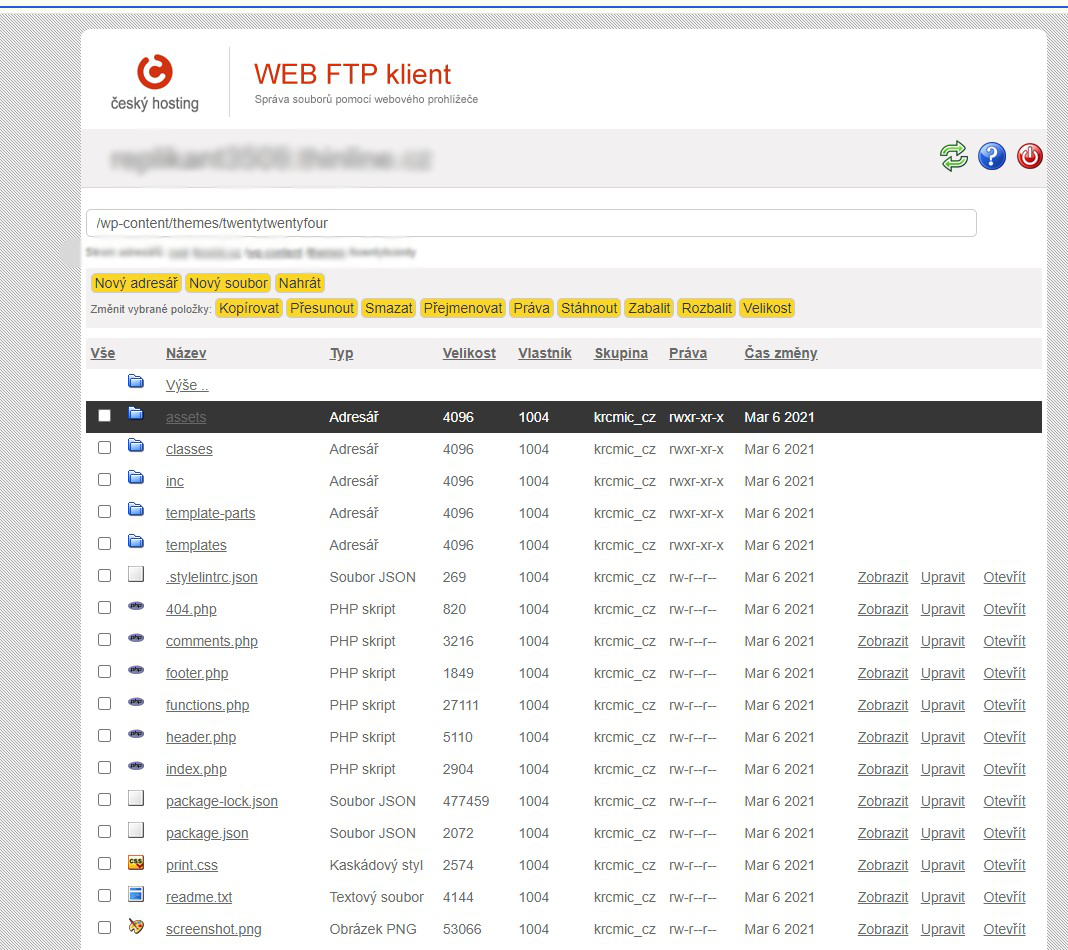
Web FTP file manager and its view folder structure
You will locate your theme’s functions.php file.
You will download it to your local computer and create a backup of functions.php file.
Then you will paste the code snippet for creating a new admin user at the bottom of the functions.php file:
function wpb_admin_account(){
$user = 'Username';
$pass = 'Password';
$email = 'email@krcmic.com';
if ( !username_exists( $user ) && !email_exists( $email ) ) {
$user_id = wp_create_user( $user, $pass, $email );
$user = new WP_User( $user_id );
$user->set_role( 'administrator' );
} }
add_action('init','wpb_admin_account');
You will change the blue values above according to your needs.
Save it and new functions.php you will upload to the hosting and overwrite the old file.
Go to your WordPress login URL and sign in with your new admin user credentials.
Once you log in, you will remove the code from functions.php to prevent it from running again.
Why use an FTP client like FileZilla instead of a web FTP file manager
I personally recommend using an FTP client like FileZilla rather than web FTP file managers from hosters as it offers several advantages over web FTP file managers provided by hosting services companies.
For sure if you are a pure beginner and you have no plan to learn anything about web development, you can stick to web FTP managers from hosting companies. 🙂
Just to mention a few:
- Speed and efficiency – FileZilla handles file transfers more quickly and efficiently, especially for large files or bulk uploads, as it is optimized for such operations. FTP clients like FileZilla can often transfer files at higher speeds due to optimized protocols and reduced latency compared to web-based interfaces.
- Robust features – FileZilla provides advanced features such as pause and resume for transfers, a drag-and-drop interface, and detailed logs of your FTP sessions, which are often not available in web-based file managers.
- Reliability – FTP clients are more stable for long file transfer sessions and can handle interruptions better than web-based managers, reducing the risk of corrupted or incomplete transfers.
- Security – FileZilla supports secure FTP connections (SFTP), ensuring your data is encrypted during transfer. This adds an extra layer of security compared to some basic web-based file managers.
- User interface – FileZilla offers a more intuitive and user-friendly interface, allowing easier navigation and file management compared to the often simpler and more limited interfaces of web FTP managers.
- Multi-platform support – FTP clients like FileZilla are available for various operating systems (Windows, macOS, Linux), providing consistent functionality regardless of the platform.
- Customizability – FileZilla allows users to configure settings according to their needs, such as connection retries, timeout settings, and custom commands, offering greater flexibility.
- Batch processing – FTP clients can handle batch processing of files, enabling users to queue multiple files for upload or download, which is not always possible with web-based file managers.
- Offline capability – FTP clients can manage files offline and queue them for transfer once a connection is available, which is useful for intermittent internet connections.
Learn more WordPress functions.php hacks
Besides adding a new admin user, there are many useful tricks you can implement with the functions.php file. You can add new widget areas to create additional widget areas in your theme to customize your site’s layout and functionality.
You can disable automatic update notifications to prevent email notifications for automatic updates, reducing inbox clutter. You can also register custom post types and taxonomies to better organize your content. Creating custom shortcodes allows you to add reusable content snippets. Additionally, you can modify the custom login page to match your site’s branding and define custom image sizes for different use cases.
Additionally, you can enqueue scripts and styles to ensure they are loaded properly and only when needed. Remove unnecessary meta tags to clean up your site’s header. Add theme support for features like post thumbnails, custom headers, and backgrounds. Control the length of post excerpts and limit post revisions to save database space. Prevent the loading of WordPress emoji scripts if they are not needed. Enhance security by restricting admin access by IP addresses. Define new user roles with specific capabilities to tailor user permissions.
Was this article helpful?
Support us to keep up the good work and to provide you even better content. Your donations will be used to help students get access to quality content for free and pay our contributors’ salaries, who work hard to create this website content! Thank you for all your support!

Reaction to comment: Cancel reply