
301 vs 302 redirects in WordPress – best practices explained
Are you wondering what the difference is between 302 and 301 redirects?
Redirects are important for providing a great user experience and helping search engines understand your site better. 302 and 301 are types of redirects that you can use for different situations.
In this article, we will compare 302 redirects versus 301 redirects. We’ll also show you the best practices when using redirects in WordPress.
302 vs 301 redirect – what’s the difference?
Redirection in WordPress allows you to send users and search engine crawlers to a different URL than the one they clicked on.
You need to set up redirects if you delete a page on your WordPress site, move to a new domain, or conduct A/B testing, and there are for sure many other reasons when you desperately need to create some redirect rules.
Without redirects, users would not see the content they requested. Instead, they’ll encounter a 404 error page, which is bad for your site’s user experience and search engine rankings.
When it comes to setting up redirects, you’ll encounter the two most common types: 301 and 302 redirects. Let’s look at each one and understand the difference.
What is a 301 redirect?
A 301 redirect is a permanent redirect. If your website or web page has been moved permanently to a new location, you can use 301 redirects to point users to the right place.
For example, when a visitor types your site’s address or clicks on a link, the 301 redirect will automatically change the requested address to the new address.
What is a 302 redirect?
A 302 redirect also helps point users and search engines in the right direction, but temporarily.
Unlike a 301, which is a permanent redirect, 302 redirects are temporary. You can move your website traffic to a new location for a limited time and then go back to the original URL whenever you want.
When should you use 301 and 302 redirects?
Now that you understand the main differences between the two types of redirects, you might be wondering when to use 301 and 302 redirects.
Depending on the conditions and your goals, it makes sense to use either 301 or 302 redirects.
When to use a 301 redirect?
Since 301 redirects are permanent, here are the scenarios when to use them:
- Migrating your WordPress website to a new domain
- Switching your site from HTTP to HTTPS
- Moving a web page to a new location
- Merging multiple pages and pointing them to a new page
- Permanently changing your site’s URL structure
When to use a 302 redirect?
On the other hand, if you don’t want to permanently redirect your audience to a new page or location, then it’s better to use 302 redirects. Here are some situations where using a 302 redirect makes sense:
- Conducting A/B tests for designs, layouts, or features of a new website or page
- Temporarily redirecting users to a sales page or promotional offer
- Sending users to the correct version of your website based on their language or location preferences
- Collecting user feedback about a new product or service without impacting your current SEO rankings
Impact of 301 redirects vs 302 redirects on SEO
When deciding between 301 and 302 redirects, it’s important to consider their impact on your site’s SEO (search engine optimization).
Search engines use bots to crawl and index your website pages, following links to discover new content. Using the correct type of redirection ensures that your blog posts are easily discovered by search engine crawlers and maintain their rankings in search results.
301 redirects and SEO
A 301 redirect indicates to Google and other search engines that a site or web page has been permanently moved. This type of redirect transfers the full link equity (often referred to as “link juice“) to the new URL. Link equity represents the value passed from one site to another, helping the new URL to rank well in search results.
302 redirects and SEO
If the change is temporary, a 302 redirect is more appropriate. A 302 redirect tells search engines that the redirection is not permanent and does not transfer the full link equity. This way, the original page retains its SEO rankings, as search engines understand that the temporary page will eventually revert back to the original URL.
Check also other SEO tips for website content.
How to set up 301 and 302 redirects in WordPress
The easiest way to set up 301 or 302 redirects in WordPress is by using a redirect plugin.
For example, you can use the All in One SEO (AIOSEO) plugin, which is a comprehensive SEO tool for WordPress. It includes a powerful redirection manager for configuring redirects. Besides that, AIOSEO also lets you perform full site redirects without any technical knowledge or editing code.
To use the redirection manager, you will need the AIOSEO Pro version. There is also a AIOSEO Lite version available for free to get you started.
First, install and activate the AIOSEO plugin. If you need assistance, refer to a guide on how to install a WordPress plugin and AIOSEO. Upon activation, you’ll be greeted by a welcome screen and setup wizard. Click the ‘Let’s Get Started’ button and follow the on-screen instructions to configure the plugin.
For additional help, you can consult a guide I mentioned above on setting up All in One SEO for WordPress correctly.
Next, navigate to the WordPress admin area and go to All in One SEO » Redirects. Click the ‘Activate Redirects’ button to enable the redirection manager feature. Once activated, access the ‘Redirects’ tab at the top of the page.
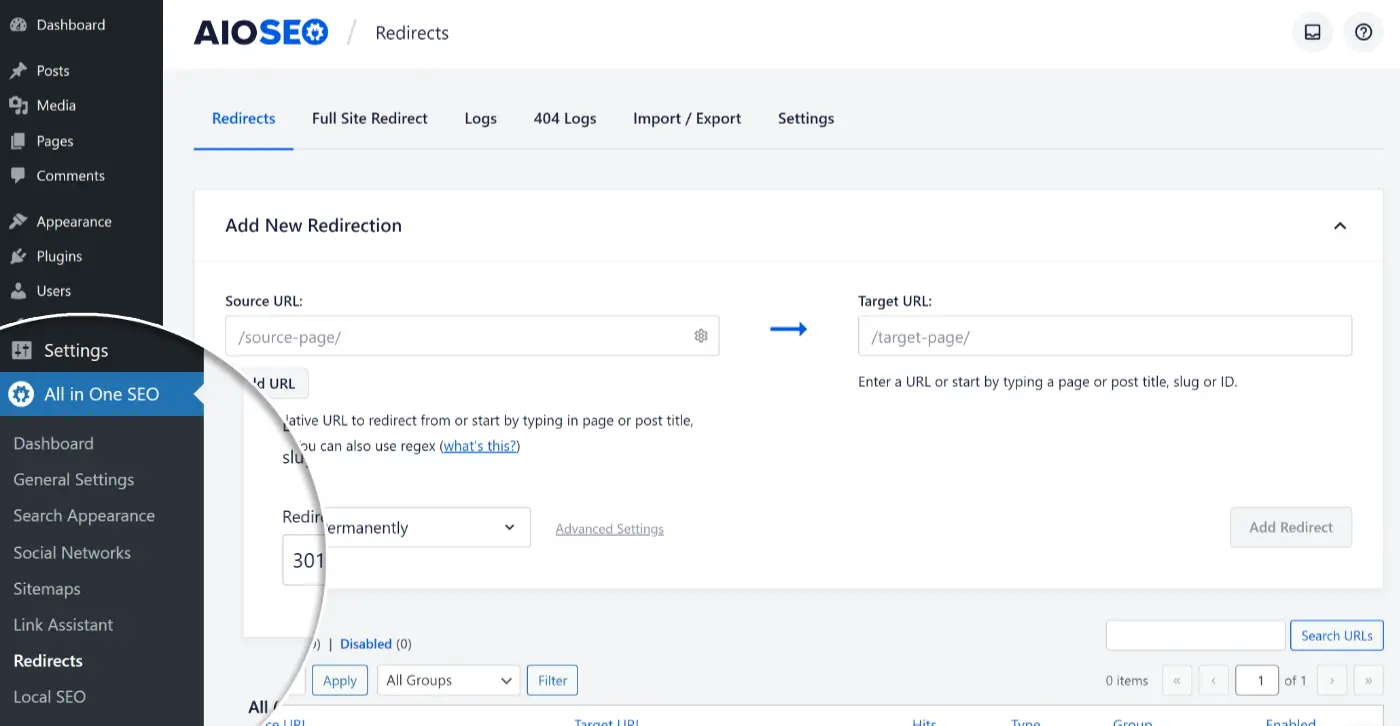
In the left corner click on Redirects
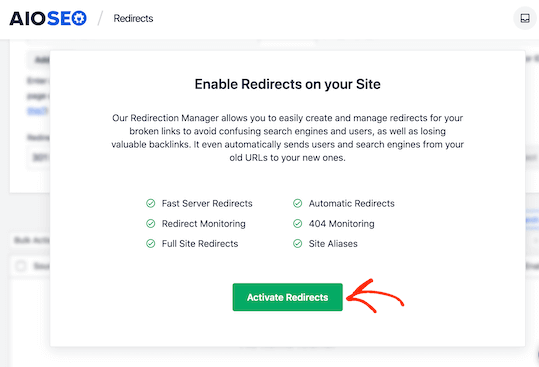
Here you have to activate redirect first
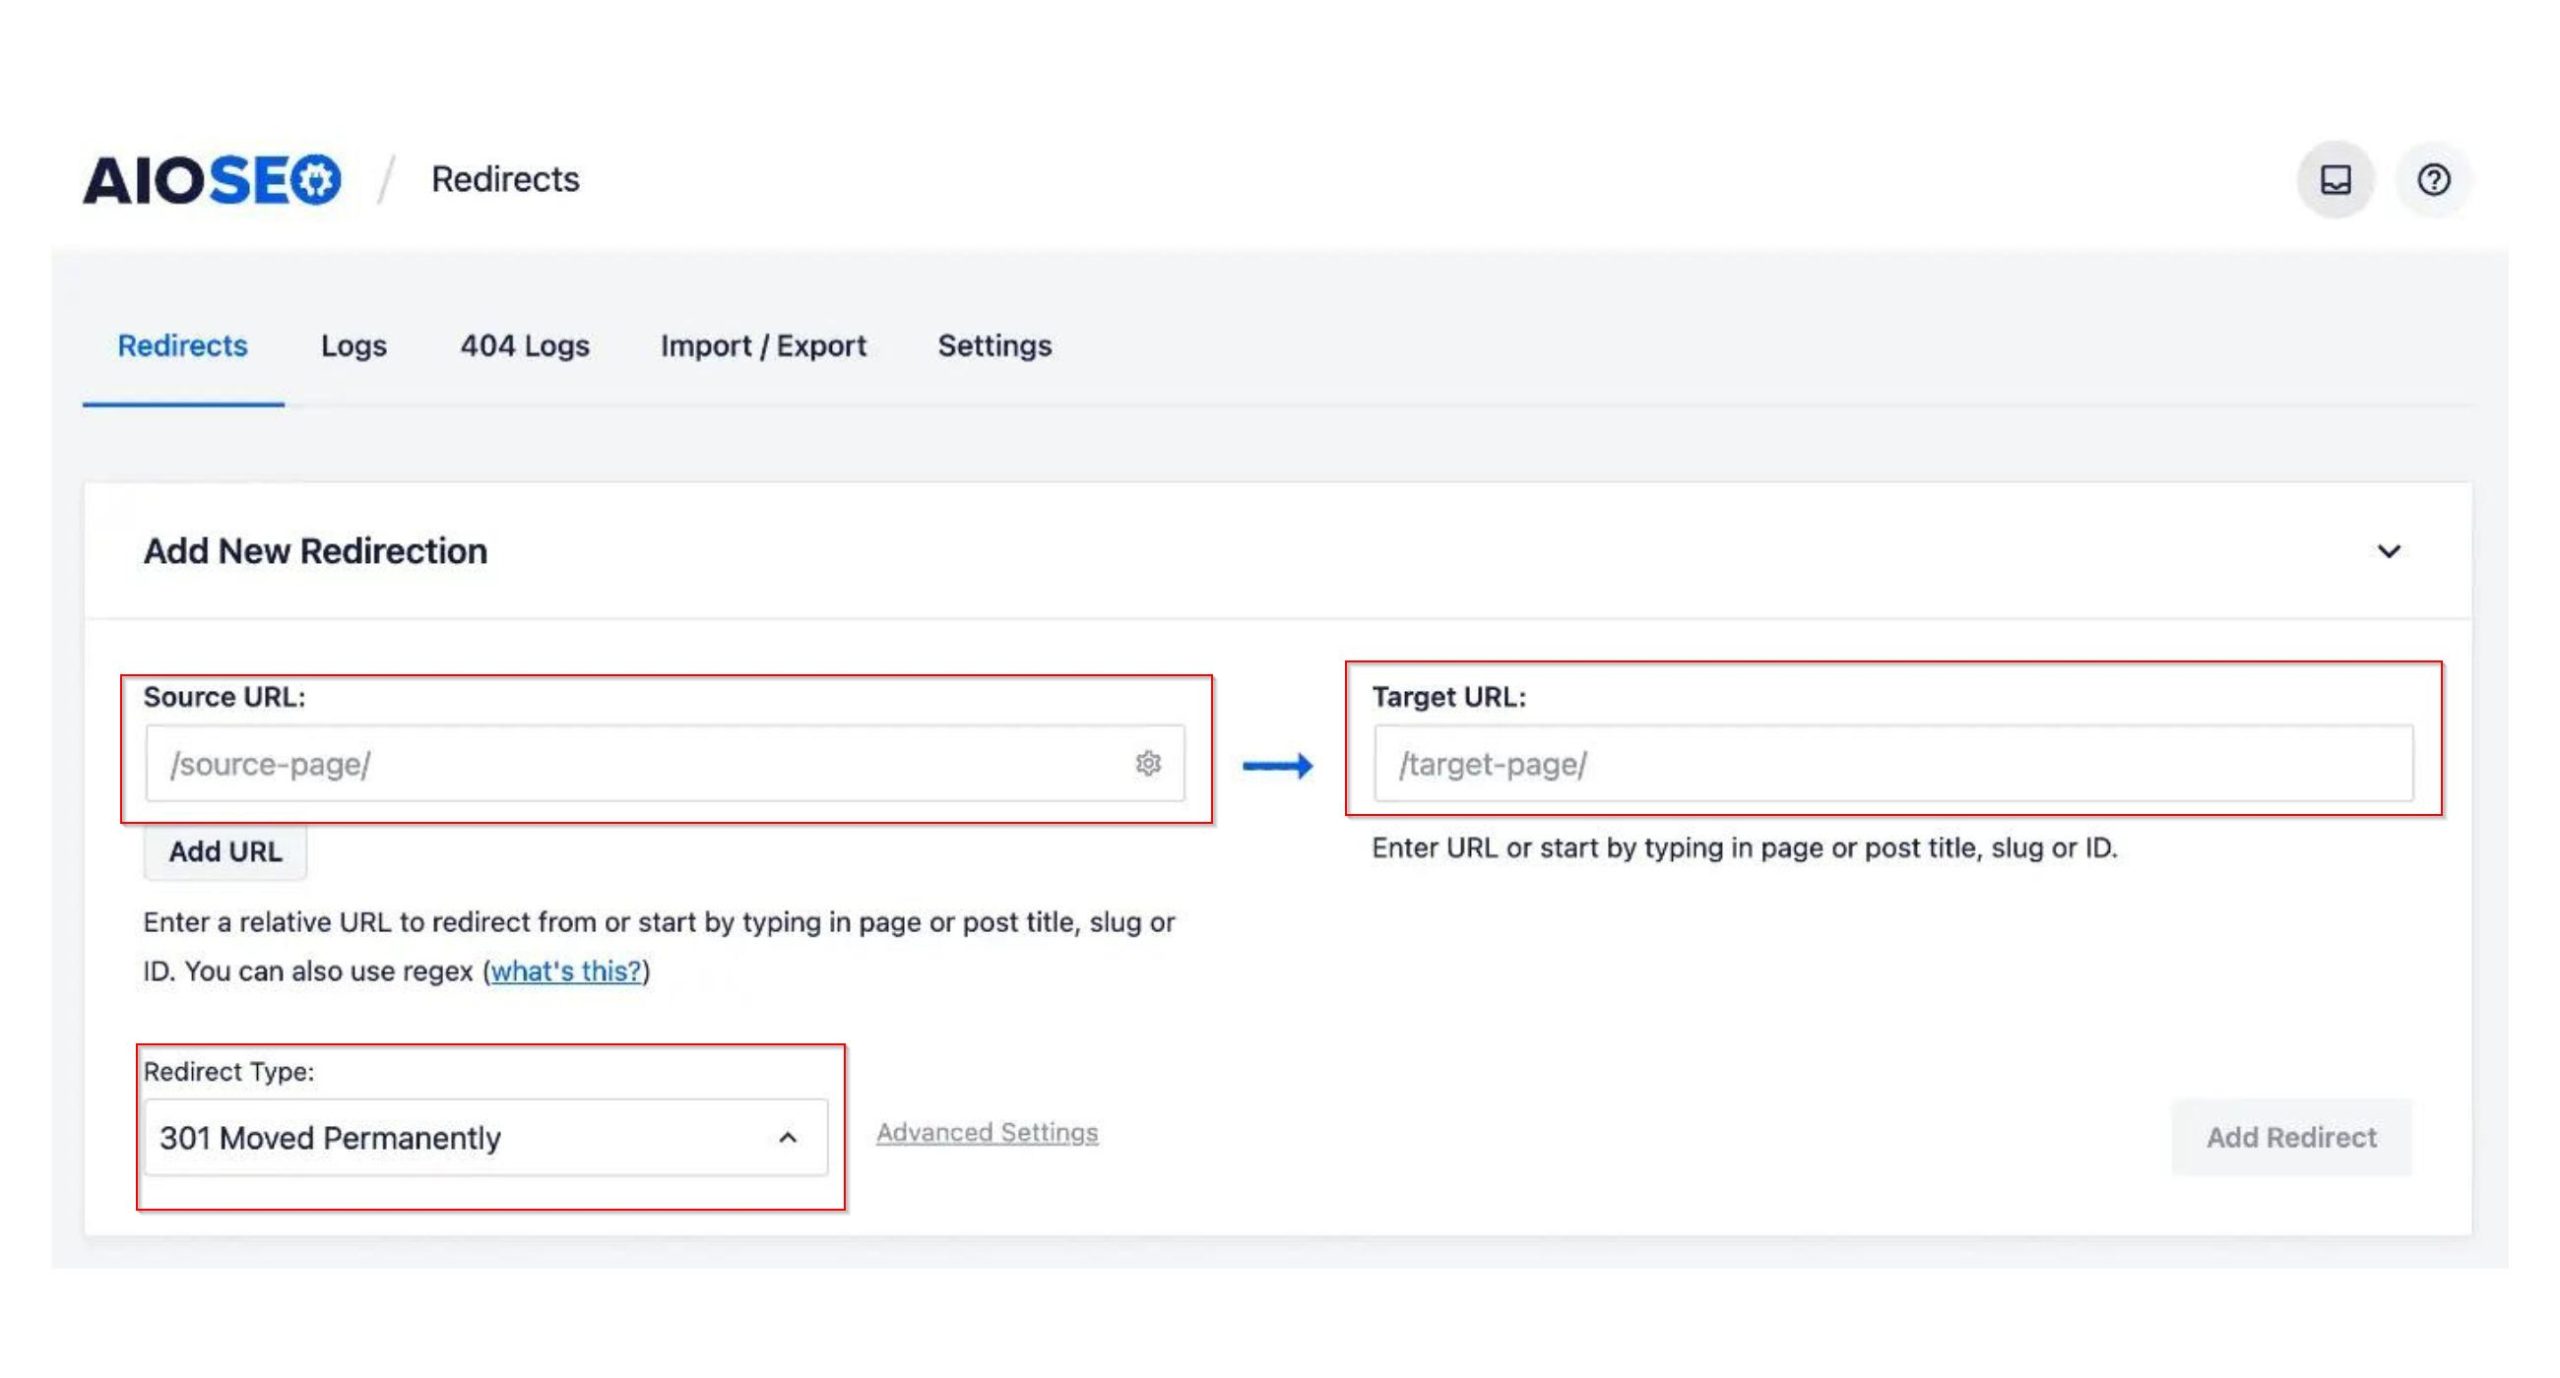
In the ‘Redirects’ tab, enter the link you wish to redirect in the ‘Source URL’ field and specify the new location for the link under the ‘Target URL’ field.
Then, select the type of redirection (301 or 302) from the ‘Redirect Type’ dropdown menu. After making your selections, click the ‘Add Redirect’ button. You can repeat this process to add as many redirects as needed.
How to redirect post or page type in All in One SEO (AIOSEO) plugin
AIOSEO also provides a log of redirects you’ve created, which you can view by scrolling down in the plugin interface. Additionally, AIOSEO allows you to perform full site redirects without requiring any technical knowledge or code editing.
Best practices for implementing 302 and 301 redirects
Setting up redirection on your WordPress website can be complicated. To help you out, here are some best practices to follow:
Testing redirects to ensure they’re working
After you’ve set up 301 or 302 redirects, it’s essential to test each link multiple times to ensure they are functioning correctly. This is crucial because any issues with the redirection can negatively impact your site’s user experience and SEO rankings. A simple way to check is by visiting your site in incognito mode and opening the redirected link. If it opens the new location, then your redirects are working properly.
Additionally, there are free tools available online that can check redirection for you. Alternatively, you can use the AIOSEO plugin, which logs your redirects within your WordPress dashboard. For those who do not want to pay any monthly fees, there is always Google Search Console.
Google Search Console is a free tool that can be very useful for monitoring your site’s health, including redirects. By using the coverage report and checking for any issues, you can identify broken redirects and other problems affecting your website’s SEO. This tool is essential for any website owner to ensure that Google can crawl and index their site correctly. More information is available on the Google Search Console page. You can also use online tools like Redirect Checker to verify that the redirects are working as intended.
For complex sites, you will need more specialized SEO tools, which also have many other essential functionalities and features:
- Marketing Miner – helps you track both 301 and 302 redirects, identify any issues, and ensure they are working correctly. Marketing Miner also provides detailed reports and insights, making it easier to manage your site’s SEO health. More information can be found on the Marketing Miner website.
- Screaming Frog – is a widely used tool for auditing and analyzing website SEO. One of its key features is the ability to check for redirect issues. Screaming Frog can crawl your entire site, identify both 301 and 302 redirects, and highlight any redirect chains or loops. This tool is invaluable for maintaining your site’s SEO health by ensuring that all redirects are functioning correctly. Additionally, it provides comprehensive reports that are easy to understand and act upon. More information can be found on the Screaming Frog website.
- Ahrefs Site Audit – offers a comprehensive site audit feature that can crawl your website and detect various issues, including problems with redirects. It checks for both 301 and 302 redirects and helps you identify any broken redirects or issues with redirect chains. By setting up regular audits, you can monitor your site’s health and ensure all redirects are functioning properly. More information can be found on the Ahrefs website.
- SEMrush Site Audit – is another powerful tool that can help you monitor and test redirects on your website. SEMrush provides detailed reports on your site’s SEO health, including identifying redirect issues. This tool allows you to schedule regular site audits, ensuring that your redirects are always working correctly and helping you maintain your SEO rankings. Visit the SEMrush website for more details.
- Moz Pro Site Crawl is also highly effective for identifying issues with redirects. Moz’s site crawl tool scans your website for common SEO issues, including problematic redirects. It provides actionable insights and detailed reports, making it easy to fix any redirect issues promptly. You can learn more about Moz Pro on their official site.
- Redirect Path by Ayima is a browser extension that can quickly check the status of redirects on any webpage you visit. This tool is particularly useful for on-the-fly checks and identifying redirect chains, ensuring that your redirects are functioning correctly in real time. You can add the extension from the Ayima website.
Most of these tools also can help you to monitor broken links.
Monitoring redirects for broken links
Next, it’s important to track broken links after adding 301 and 302 redirects to your website. If a web page is moved to another location or users are sent to a new page temporarily and the redirection fails, it will result in a broken link. Consequently, users will see a 404 error page, which can harm your site’s user experience and SEO rankings.
Tracking broken links after setting up 301 and 302 redirects allows you to fix them promptly, thereby maintaining a smooth user experience and preventing any negative impact on your keyword rankings. The best way to track broken links is by using the AIOSEO plugin. You can enable the ‘404 Logs’ feature to start monitoring for 404 error pages. Initially, you won’t see any data, as the plugin will only start recording broken links after the setting is enabled.
Once the plugin starts gathering information, you can view broken links on your site under the 404 Logs tab. To quickly fix 404 error pages, you can click the ‘Add Redirect’ option and set up 301 or 302 redirections. For more details, please see our guide on how to find and fix broken links in WordPress.
Avoid creating redirection chains and loops
A redirection chain occurs when multiple redirects are set up between the source URL and the target URL. Google officially follows up to 10 hops in a redirection chain. If there are more than 10 redirects, it could result in a redirect error in Google Search Console. To avoid this, it is best practice to minimize redirection chains and point directly to the new location of a website or page. This is particularly important when setting up permanent 301 redirects, as too many can cause errors and negatively affect user experience.
Additionally, it’s crucial to avoid redirection loops. A redirection loop happens when URLs in a chain redirect back to themselves, creating an infinite loop. As a result, users and search engines won’t reach the intended page and will instead see the original page or a ‘redirected you too many times’ error. To fix this, remove all redirects in the chain and redirect directly to the final destination.
How to fix redirection chains and loops
To fix redirection chains, you should audit your redirects and ensure each URL points directly to the final destination without unnecessary intermediate steps. Use tools like Screaming Frog or Ahrefs to identify and resolve these issues.
Preventing duplicate content
Another best practice for using 301 and 302 redirects is to avoid duplicate content issues, especially if your site uses multiple subdomains. For example, if your site’s URL has HTTP and HTTPS, www and non-www versions, or variations with capitalized and lower-case URLs, search engines may view these as separate sites, leading to duplicate content problems.
To fix this, redirect all subdomains to a single preferred URL. For instance, redirect both HTTP and non-www versions to the HTTPS www version. This consolidation helps prevent duplicate content issues and improves SEO.
Additional tips
- Migrating sites – when migrating sites and domains, you might use a 302 redirect temporarily to indicate to Google and other search engines that the move is temporary and the content isn’t duplicated permanently. Once the migration is complete, set up 301 redirects to indicate the preferred version of the content for indexing.
- Redirects monitoring – regularly monitor and audit your redirects to ensure they are functioning correctly and not causing issues. Tools like Google Search Console, Screaming Frog, Ahrefs, and SEMrush can help you identify and resolve any redirect problems efficiently. This is crucial for bigger projects which is dependent on your living. You can set up alerts, notifications, reports, etc.
- Using canonical tags – in addition to redirects, using canonical tags can help manage duplicate content by indicating the preferred version of a webpage to search engines. This can be particularly useful for managing similar or duplicate content across different URLs.
- Implementing SSL/TLS – ensure that all redirects point to the HTTPS version of your site to provide a secure browsing experience for your users. This not only improves security but also enhances SEO, as search engines favor secure sites.
How to redirect a website using the .htaccess file in WordPress
The .htaccess file is a configuration file used by the Apache webserver to manage redirects, among other functions. Here’s how you can set up redirects using the .htaccess file in WordPress:
Step 1: Locate the .htaccess file
- Access your hosting account – log in to your web hosting account and navigate to the file manager.
- File manager – open the file manager application provided by your hosting service. Alternatively, you can use an FTP client like FileZilla.
- Locate the file – navigate to the root directory of your WordPress installation. This is usually the public_html or www directory. The
.htaccessfile is located here. Some hosting companies need to first allow you to use.htaccess, so better to contact your hosting first or check if they have some tutorial for that.
Step 2: Edit the .htaccess File
- Backup the file – before making any changes, download a copy of the
.htaccessfile to your local computer for backup purposes. - Open the file – open the
.htaccessfile using a text editor within the file manager or download it and open it using a text editor like Notepad or TextEdit.
Step 3: Add redirect rules
Add the appropriate redirect rules to the .htaccess file based on the type of redirect you need for
- 301 redirect (permanent redirect):
Redirect 301 /old-page.html http://www.yoursite.com/new-page.html
- 302 redirect (temporary redirect):
Redirect 302 /old-page.html http://www.yoursite.com/new-page.html
- Redirecting the entire site – if you want to redirect an entire site to a new domain, use:
RewriteEngine On

RewriteCond %{HTTP_HOST} ^oldsite\.com [NC]

RewriteRule ^(.*)$ http://newsite.com/$1 [L,R=301,NC]
- Non-WWW to WWW redirect:
RewriteEngine On

RewriteCond %{HTTP_HOST} !^www\. [NC]

RewriteRule ^(.*)$ http://www.%{HTTP_HOST}/$1 [L,R=301]
- WWW to non-WWW redirect:
RewriteEngine On

RewriteCond %{HTTP_HOST} ^www\.(.*)$ [NC]

RewriteRule ^(.*)$ http://%1/$1 [L,R=301]
- Redirecting to HTTPS:
RewriteEngine On

RewriteCond %{HTTPS} off

RewriteRule ^(.*)$ https://%{HTTP_HOST}%{REQUEST_URI} [L,R=301]
Step 4: Save changes
- Save the file – save the changes to the
.htaccessfile. - Upload the file – if you downloaded the file for editing, upload it back to the root directory of your WordPress installation, replacing the old file.
Step 5: Test the redirects
- Test in browser – open your web browser and test the old URLs to ensure they are redirecting correctly to the new URLs.
- Use online tools: You can also use online tools like Redirect Checker to verify that the redirects are working as intended.
Important notes
- Backup regularly – always back up your
.htaccessfile before making any changes. - Syntax – ensure that you follow the correct syntax for each redirect rule to avoid errors.
- Permissions – make sure that the file permissions allow for writing changes to the
.htaccessfile. This is typically set to 644.
By following these steps, you can effectively manage and implement redirects on your WordPress site using the .htaccess file. For more details, you can refer to WordPress Codex and Apache documentation.
Was this article helpful?
Support us to keep up the good work and to provide you even better content. Your donations will be used to help students get access to quality content for free and pay our contributors’ salaries, who work hard to create this website content! Thank you for all your support!

Reaction to comment: Cancel reply